Cross-Hatch Scanning (looking for singles)
When a candidate k is possible in only a single cell of a row, column, or block, then that cell must be k.This situation can arise for one of two reasons. A naked single arises when there is only one possible candidate for a cell; a hidden single arises when there is only one possible cell for a candidate. Despite the name, hidden singles are far easier to find than naked singles. You should always start a Sudoku by finding all the hidden singles. No marks required!
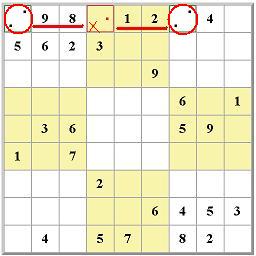
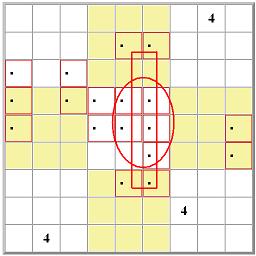
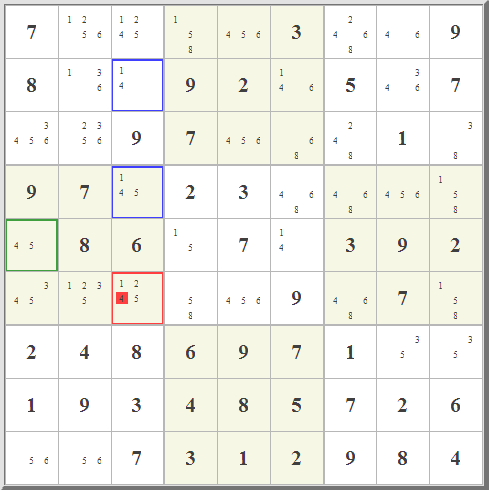
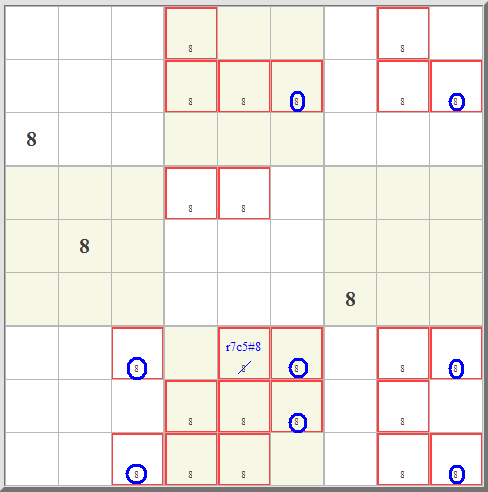
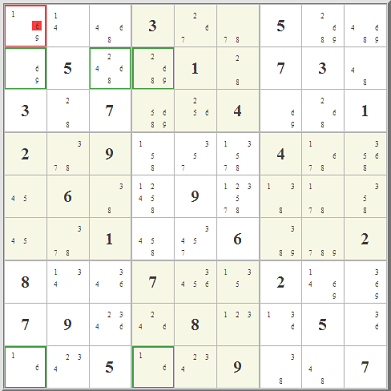
The dots in the cell in row 3, column 5, indicate that in that cell the numbers 4, 5, 6, and 8 are all possible. But in that top middle block only one cell can hold a 5. That's a hidden single. | This is the most basic technique. Since a number can only appear once in any given column or row and must appear exactly once in any given 3x3 block, the easiest place to start is to first check for cells that must hold a value because no other cell in a 3x3 block can hold that number. For example, in this case the number 5 is excluded from all but one cell in the top center 3x3 block. The 5 in this cell is called a "hidden single" because it can only be in this single location, and that fact is "hidden" by the presence of the other marks. This process, referred to as cross-hatching, is repeated for each row and each column. Cross-hatch scanning is generally all that is necessary for "easy" puzzles. Most people do this step without actually making any marks. | ||||||||||||||||||||||||||||||||||||||||||||||||||||||||||||||||||||||||
Generalized Method Rule | |||||||||||||||||||||||||||||||||||||||||||||||||||||||||||||||||||||||||
|---|---|---|---|---|---|---|---|---|---|---|---|---|---|---|---|---|---|---|---|---|---|---|---|---|---|---|---|---|---|---|---|---|---|---|---|---|---|---|---|---|---|---|---|---|---|---|---|---|---|---|---|---|---|---|---|---|---|---|---|---|---|---|---|---|---|---|---|---|---|---|---|---|---|
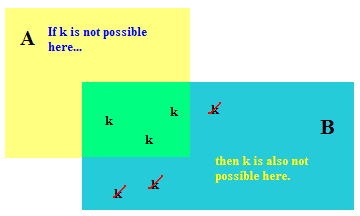
First of all, if the rules discussed below sound pretty much the same, it's because they are all just permutations of the same
idea in different dimensions. Using "A" and "B" here for some number of rows, columns, cells, or blocks, then we have:
If a candidate k is possible in the intersection of A and B but not possible elsewhere in A, then it is also not possible elsewhere in B.
This idea is more fully discussed mathematically in The 12 Rules of Sudoku. | |||||||||||||||||||||||||||||||||||||||||||||||||||||||||||||||||||||||||
Row/Column Range Checking ("locked" candidates) examples | |||||||||||||||||||||||||||||||||||||||||||||||||||||||||||||||||||||||||
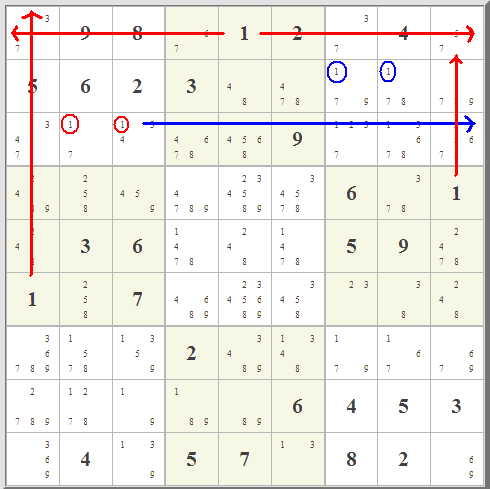
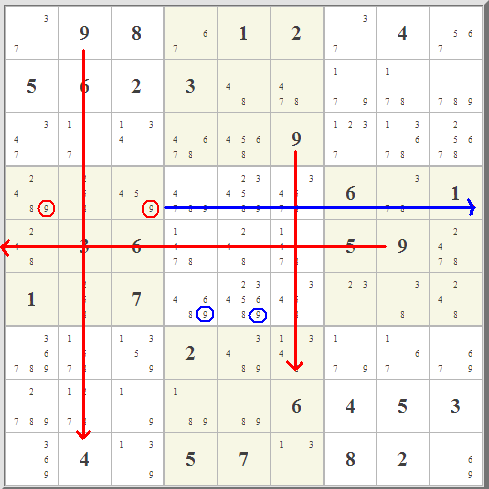
The locked candidate rule, form 1:
When a candidate is possible in a certain block and row/column, and it is not possible anywhere else in the same row/column, then it is also not possible anywhere else in the same block.The locked candidate rule, form 2: When a candidate is possible in a certain block and row/column, and it is not possible anywhere else in the same block, then it is also not possible anywhere else in the same row/column.Once all the singles have been found, I usually start marking. Then the job is to eliminate marks until only one remains in a cell, so then we know that cell's value. In this next technique, we use the fact that once a number can be assigned to a given row or column of a specific block (even if its exact location is still unknown), no other block may have that same number in the same row or column. | |||||||||||||||||||||||||||||||||||||||||||||||||||||||||||||||||||||||||
| |||||||||||||||||||||||||||||||||||||||||||||||||||||||||||||||||||||||||
| |||||||||||||||||||||||||||||||||||||||||||||||||||||||||||||||||||||||||
Subset Elimination examples | |||||||||||||||||||||||||||||||||||||||||||||||||||||||||||||||||||||||||
As for locked cells, there are two subset rules. The naked subset rule states:
When n candidates are possible in a certain set of n cells all in the same block, row, or column, and no other candidates are possible in those cells, then those n candidates are not possible elsewhere in that same block, row, or column.The hidden subset rule states: When n candidates are possible in a certain set of n cells all in the same block, row, or column, and those n candidates are not possible elsewhere in that same block, row, or column, then no other candidates are possible in those cells.Thus if a "subset" of three cells can be identified for which the only possibilities are exactly three numbers, then even though we don't know which of those cells has which number in it, we still know that no other cells in the row, column, or 3x3 block containing that "subset" of cells can have any of those numbers. | |||||||||||||||||||||||||||||||||||||||||||||||||||||||||||||||||||||||||
| |||||||||||||||||||||||||||||||||||||||||||||||||||||||||||||||||||||||||
Other advanced techniques are required to solve more difficult Sudoku puzzles such as this one.
These techniques are based on one of the following two rules:
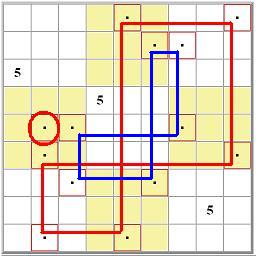
When a candidate is possible in a certain set of cells that form the intersection of a set of n rows and n columns, but are not possible elsewhere in that same set of rows, then they are also not possible elsewhere in that same set of columns.and its flipside, When a candidate is possible in a certain set of cells that form the intersection of a set of n rows and n columns, but are not possible elsewhere in that same set of columns, then they are also not possible elsewhere in that same set of rows.The grid technique involves picking a specifc number, such as 5, and checking for known allowed patterns of possibility such as X-wings and swordfish.
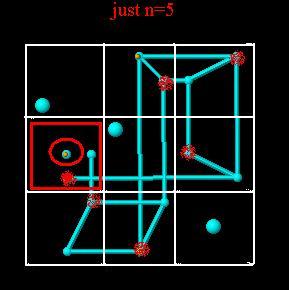
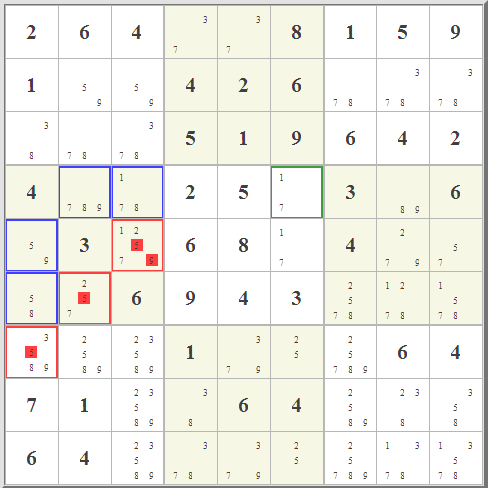
Note that grid analysis is essentially a form of 2-dimensional subset elimination, where now the subsets themselves are correlated over multiple rows or columns. So, for example, if you look at that blue pattern, there is a set of three columns (the third, the sixth, and the seventh) for which 5 can only be in rows 2, 5, and 7. Three columns...three rows. Just like "three numbers...three cells". In exact analogy to subset elimination, this means that for these three rows the five must be in one of these three columns. it's tricky! In fact, though, X-wings and swordfish are simply two simple varieties of a much broader category of beast.
The demonstration of this equivalence of all such "circuits" is the way in which the Sudoku Assistant handles all circuit analysis without distinction:
| |||||||||||||||||||||||||||||||||||||||||||||||||||||||||||||||||||||||||
| |||||||||||||||||||||||||||||||||||||||||||||||||||||||||||||||||||||||||
| Since an n by n set of cells defines exactly where n numbers can go, the principle is the same regardless of the number n. So all we are doing in this sort of analysis is idenitifying a set of n rows and n columns that contain a given candidate's possibility at their points of intersection. All other possibilities, all those not at these grid points, can be eliminated safely. | |||||||||||||||||||||||||||||||||||||||||||||||||||||||||||||||||||||||||
Bent Naked Subsets examples | |||||||||||||||||||||||||||||||||||||||||||||||||||||||||||||||||||||||||
Consider a simple naked triple:
What prevents the cell with * being a 2? Well, if a 2 were there, then we would be eliminating both possibilities of 2 in that same row and in particular in our naked triple, right? Those cells, in turn, would have to be 1 and 3, and that would remove the only possibilities for the cell having only 13 in it. This is how all naked sets work. You have N cells having among them N possible candidates. If an option removes one of those possibilities from the set, then there aren't enough candidates to go around, and that option can be eliminated. Now consider what is referred to as an XY-Wing:
Notice that the three cells constituting the XY-Wing form a naked triple. It's just that this triple is "bent" -- the three cells are not in the same row, column, or block. What are the implications of that? First, unlike a standard naked triple, it's possible that both the 12 and the 23 cells are 2. So that's no help. But here's the interesting thing: It is still not possible for NEITHER of them to be 2. Because they still have exactly the same relationship to the 13 cell. If neither is 2, then they are 1 and 3, and then the 13 cell is left with no possibility. The cell marked with * cannot be 2. It's as simple as that. XY-Wings are just bent naked triples.
But beware! If the middle cell were 123 instead of 13, this strategy would not work, because the 2 we struck would not be in a position to see all the cells of the subset containing 2, and if one of the ends were 123 instead of just 12 or 13, then the strategy would not work because two values would be common in the two ends, not just one. (And it would not be an XY-Wing.) The idea of a "bent" naked subset is that the subset involves two domains -- a row and a column, a row and a block, a column and a block, or even two rows or two colunns. The key is the cells that are NOT in the intersection of those two domains. If there is a value k possible in both of these domains outside that intersection, then we have the simple rule: If a bent naked subset contains one and only one candidate k that is present in both of its nonintersection subdomains, k can be eliminated as a candidate in any cell that sees all the possibilities for k in the subset.
Why exactly does this work? Let's use our general intersection idea to prove that when there is just one common value in the nonintersecting region of the subset, that candidate must not be eliminated. The proof goes something like this:
This points to another rule for bent naked subsets: When there is no common value k in the two nonintersecting regions of a bent naked subset, the subset behaves as a standard naked subset. That is, candidate k can be eliminated from any cell that can "see" all cells of the subset containing k.
I suggest that bent naked subsets should be pretty easy to see in a puzzle. The Sudoku Assistant can find some, but not all, bent naked subsets. | |||||||||||||||||||||||||||||||||||||||||||||||||||||||||||||||||||||||||
Almost-Locked Sets examples | |||||||||||||||||||||||||||||||||||||||||||||||||||||||||||||||||||||||||
Closely related to bent-naked subsets is an idea that has been referred to
as almost-locked sets. An "almost-locked" set is one that consists of n cells containing n+1 values.
Removal of any one value from this set will "lock" the set as a naked subset. It turns out that a certain combination of
almost-locked sets constitute one type of bent naked subsets, so there is some overlap in this analysis. Let's look
again at that last example of a bent naked subset.
We could represent the situation as shown below:
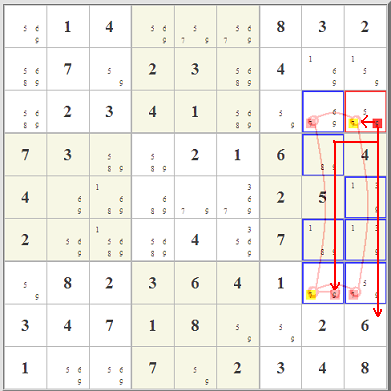
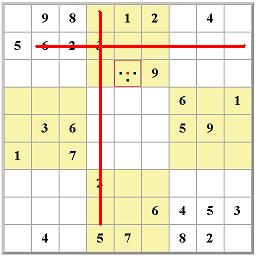
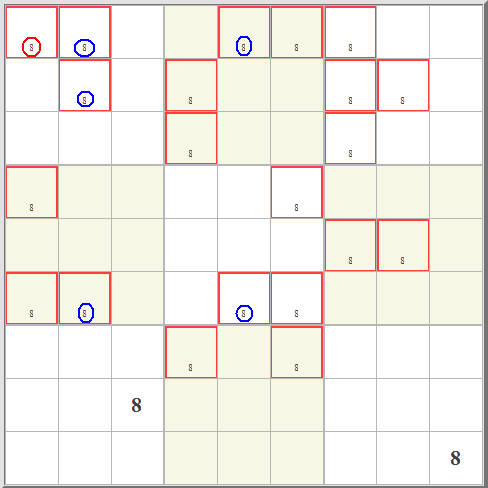
Almost-locked set A involves two candidates {17}; almost-locked set B involves five candidates {15789}. Candidates 1 and 7 are special, because if one set has one of them, the other set doesn't and must have the other. So, for example, if we remove the 7 from both of these sets, we run into a problem, because then both of them need the 1. But only one of them can have the 1, because all the 1s are in Row 4. Same for the 7. So we can eliminate any 7 or 1 that "sees" all of the 7s and 1s in our pair of almost-locked sets. But it's better than that. We can also eliminate all the 5s, 8s, or 9s that see all their kind in the pair as well. That's because eliminating any of these candidates forces one of the sets A or B to require both the 7 and the 1, leaving the other without enough candidates. We can eliminated all the candidates marked in red. So we have a new rule: If two almost-locked sets are mutually doubly linked, any candidate k elsewhere that "sees" all the candidates k in the two sets can be eliminated.Similarly, in that next-to-last example of a bent naked subset, where we have the bent naked subset {14} {145} {45}, you can divy up the two almost-locked sets two different ways. If we use A={14 145} and B={45}, then we can write:
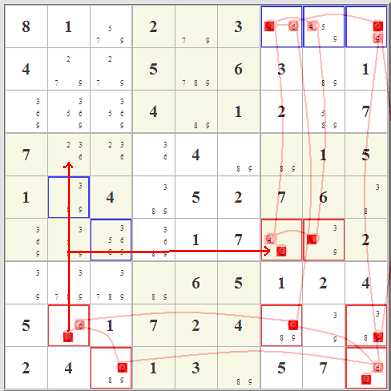
Here we have
Notice that these sets are not doubly linked. However, they have the common value 4. Removing 4 from both of these sets would cause both to require 5, but they can't both require 5, so we can eliminate 4 from any cell that can see all three of these cells. Same with the 1. Specifically, in this case we get to eliminate 4 from the cell colored in red. So we have a the rule: If two almost-locked sets are linked by candidate i and have a different common candidate k, then any candidate k elsewhere that "sees" all the candidates k in the two sets can be eliminated.This turns out to be a far more common situation than the doubly-linked pair business described above. There are lots of things that can be done with almost-locked sets. Basically, they can plug right into sets of chains, because they can transmit a weak link. That's because if one of the candidates in the set is forced FALSE, then all the other candidates are forced TRUE (and the set is locked). That's the essence of a weak link. One problem, though, is that they can be plentiful. It's not uncommon for a Sudoku board to have 100 or more almost-locked sets. So finding the one or two that produce an elimination can be difficult and time-consuming. Still, you might just find one. | |||||||||||||||||||||||||||||||||||||||||||||||||||||||||||||||||||||||||
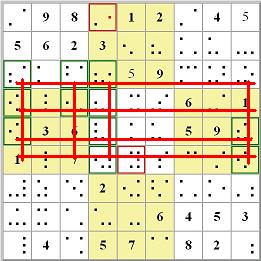
Grid-Based Almost-Locked Sets (Including Sashimi) examples | |||||||||||||||||||||||||||||||||||||||||||||||||||||||||||||||||||||||||
A little-heralded characteristic of almost-locked sets is that they also apply to single-value grids.
The key here is that one value can knock out two possibilities of an almost-locked set. You can't
do this with value-based almost-locked sets -- a 7 somewhere knocks out a 7, not a 7 and an 8 --
but that is possible for a grid-based almost-locked set. Let's see how that works.
It's interesting that the Sudoku Assistant originally only found column-based Sashimi. This was not a bug. It was because Sudoku Assistant checked column-based subsets first and did not consider that large column-based Sashimi can be alternatively represented as smaller row-based Sashimi. That is, the same sort of row/column relationship with grids (that an n x n grid in rows is always also an m x m grid in columns) has an analogy with Sashimi. (If you want to play with this, add the ALSLARGE option when you list the A1s examples, looking specifically for row-type Sashimi. Then Sudoku Assistant will find large Sashimi as well as small.) Thus we have the following additional rule: All Sashimi in rows(columns) have complementary Sashimi in columns(rows). These alternative eliminations always involve the complementary set of columns and rows of the original Sashimi and involve the same elimination.Here is an example:
| |||||||||||||||||||||||||||||||||||||||||||||||||||||||||||||||||||||||||
Almost-Locked Ranges | |||||||||||||||||||||||||||||||||||||||||||||||||||||||||||||||||||||||||
 In effect what these almost-locked ranges do is to shift the direction of a weak link. The upper nine
types turn the direction of a weak link by 90 degrees,
switching the link from a row-based link to a column-based one or vice-versa; the bottom six amplify the signal along a parallel
row or column. When coupled with a strong chain, almost-locked ranges
can have the interesting consequence noticed by the discoverer of the Franken Fish. In effect what these almost-locked ranges do is to shift the direction of a weak link. The upper nine
types turn the direction of a weak link by 90 degrees,
switching the link from a row-based link to a column-based one or vice-versa; the bottom six amplify the signal along a parallel
row or column. When coupled with a strong chain, almost-locked ranges
can have the interesting consequence noticed by the discoverer of the Franken Fish.
I don't know that it makes a whole lot of sense to name combinations of almost-locked ranges and conjugate pairs and such. These things are everywhere; when I solve Sudoku puzzles, I simply follow them and see where they lead. In combination with strong chains, they can easily lead to eliminations. By the way, that yellow-highlighted cell is what makes almost-locked ranges a different sort of idea from almost-locked sets. Unlike almost-locked sets, here we have a cell where, if a candidate is present, both options disappear. That yellow cell is in effect a weak link to both the red and blue subsets, generating a FALSE in all four directions. This is really quite different from almost-locked sets, where N-1 candidates must ultimately be present somewhere within the set. Four simple examples will suffice to illustrate almost-locked ranges. Browse the examples for over 100 more.
The possibilities are endless. It's safe to say that almost-locked sets are everywhere, and they can be powerful in generating eliminations. The table below summarizes the Sudoku Assistant's solving of the impossible520 set. "A" here is simple almost-locked set analysis; "a" is that in combination with weak links to strong chains. "Ms" and "Mw" are Medusa strong and weak chain analysis, respectively, where no almost-locked sets were involved. Clearly when almost-locked analysis is in place, Sudoku Assistant uses it extensively. It's interesting to compare these results to when almost-locked set analysis is turned off (in the table below). The number of puzzles where Sudoku Assistant resorted to pure hypothesis goes up from 18 (about 4%) when using almost-locked set analysis to 95 (about 18%) when not using it. | |||||||||||||||||||||||||||||||||||||||||||||||||||||||||||||||||||||||||
The Sudoku Assistant and Almost-Locked Sets examples | |||||||||||||||||||||||||||||||||||||||||||||||||||||||||||||||||||||||||
The Sudoku Assistant by default does not look for almost-locked sets because it slows down the processing to do that, and they have not proven to be generally decisive in solving puzzles. But when those checkboxes are checked, it currently does the following:
| |||||||||||||||||||||||||||||||||||||||||||||||||||||||||||||||||||||||||
3D Medusa Analysis examples | |||||||||||||||||||||||||||||||||||||||||||||||||||||||||||||||||||||||||
| If a grid of cells can be made for which the value in one cell directly forces the value in another cell, we can sometimes follow that grid to see if it leads to a logical inconsistency. This can be done even though the exact contents of a cell are unknown. Some algorithms look for "strong cycles" with "weak edges," but there is another way to think about this. What is significant is that in a "binary grid" every other cell along the grid either has one value or another -- only two possible values. (The grid is made by specifically selecting only cells that have exactly two possibilities.) If any two such cells are in a single row, column, or 3x3 block, it is as if they were the ONLY possibilities for their cells. | |||||||||||||||||||||||||||||||||||||||||||||||||||||||||||||||||||||||||
| |||||||||||||||||||||||||||||||||||||||||||||||||||||||||||||||||||||||||
| |||||||||||||||||||||||||||||||||||||||||||||||||||||||||||||||||||||||||
Weakly Linked Chains examples | |||||||||||||||||||||||||||||||||||||||||||||||||||||||||||||||||||||||||
|
A full 3D Medusa analysis involves extending these idea to weakly linked chains (encompassing X cycle Type 2 as well as Y cycles).
The idea here is that one may have a sequence of three "nodes" (row, column, and candidate value, in 3D)
A --- b --- C, for which A and C are members of strong chains (their cells have only two possible values). We call this a "weak link" or "weak edge"
if A, b, and C all are in the same row, column, or block -- or, in a 3D sense, the same cell.
In that case, the "strongness" of one chain can be transferred to the other chain, provided the right
condition is applied. (In other words, we can assert "if A is 5...then C is NOT 5", but we cannot assert that "if A is NOT 5, then C is 5.")
The Sudoku Assistant can follow these weak links to any number of associated chains in order to eliminate possibilities.
The classic example of weakly linked chains in the form of a Y-cycle is an XY-wing, shown below.
X... and Y... here are weak links. The first links the strong chains XZ and XY; the second links the strong chains XY and YZ. It doesn't really matter if those links are there or not. (If they are not there, then we just have one strong chain.) The effect is the same: "NOT Z" in the lower left cell gets transmitted to the top right cell through the chain:
as "Z" at the other end. Or, if the other Z is false, then we have:
So one or the other of the Zs on the ends must be TRUE, and the * cannot be Z. The term I use for * in the above situation is weak corner. Here we have again A --- b --- C, for which A and C are members of strong chains. To be a weak node, A and b must be in the same row, column, block, or cell, and the same is true for for b and C. But if these aren't the same row, column, block, or cell, then we don't have a weak link. Instead, we have a weak corner. The "strongness" of one chain cannot be transferred to the other chain via a weak corner, With the proper connecting of strong chains by weak links, one can infer valuable information about such a node. In particular, the elimination of the corner node, b, can be forced by the right sort of chain connection. | |||||||||||||||||||||||||||||||||||||||||||||||||||||||||||||||||||||||||
3D Medusa Hinge | |||||||||||||||||||||||||||||||||||||||||||||||||||||||||||||||||||||||||
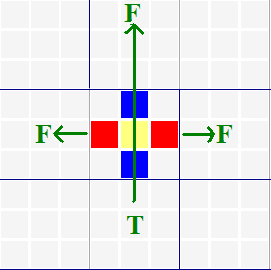
| If we know that two cells of a strong chain are positioned such that both must be X or both must not be X, and together they exclude X from a block, then neither can be X. On the right, for example, the two red Xs are linked because they are part of the same strong chain. But if they are both TRUE, then all the Xs in the top right block are disallowed. There must be some X in that box, so their being TRUE leads to a contradiction. The XA cell must be A, the XC cell must be C, and the XB cell must be X. This technique has been referred to as a strong block hinge. Medusa variants also target cells in the same row or column, or target values in the same cell. |
Cells XA and XC cannot be X, and the cell labeled "XB" must be X. |
||||||||||||||||||||||||||||||||||||||||||||||||||||||||||||||||||||||||
|
The chain connecting XA and XC need not be strong. If one of the ends is a weak node, then the result is that we have a weak hinge, and we can eliminate that weak node.
In the example on the right, if XA is X, we cannot say anything about XC because the X in XC is only weakly linked to the X of XB. (Only when XB is X can we say anything about XC; when XB is not X, we can't conclude anything about XC.)
But the weak link does work the other way. So if XC were X, then XB would have to be "not X" (B),
and XA would have to be X. But then the two ends of the hinge would be X, and that would remove all possibilities for X in Row 2. So XC must be C, not X.
The Sudoku Assistant will find these sorts of hinges if the "hinge" box is checked. |
The cell labeled "XC" must NOT be X. |
||||||||||||||||||||||||||||||||||||||||||||||||||||||||||||||||||||||||
Hypothesis and (Dis)Proof examples | |||||||||||||||||||||||||||||||||||||||||||||||||||||||||||||||||||||||||
|
The addition of weakly associated nodes to the mix of strong 3D chains allows for
a method of solving Sudoku puzzles that transcends the idea of "forcing chains" or
"trial and error" to allow for the formation of hypotheses regarding possible candidate
elimination and their direct proof.
Using 3D Medusa chains, we can follow the implications of eliminating or not
eliminating a mark and see what comes of it. There are two strategies for this analysis,
which I am calling proof or disproof.
The disproof strategy goes like this: Consider a certain chain, 3, that has two possible states, 3C and 3c.
An example of a pattern that is handled easily by hypothesis and proof is what has been referred to as an XYZ-wing. Both the * and Z here are weak corners between the two strong chains XZ and YZ. Let's hypothesize that the * is Z. Any Z shown, then, would be FALSE. But the X of XZ and the Y of YZ both must be TRUE, because they are parts of the strong chains associated with that * node. OK, so if they are TRUE then they each force the X and Y of XYZ to be FALSE. But then all of X, Y, and Z have to be FALSE. That leaves nothing at that position, and the hypothesis is disproved. Therefore, * is not Z. QED.
Note that in practice you don't really have to think about chains at all if you don't want to. Just follow the logic. One node TRUE means all those "related to it" are FALSE. From there, look for strong connections -- a cell with only two values in it, or a row, column, or block with only two of the TRUE node's value. Those are the strong chains that can be set TRUE. Go from there to find more FALSE nodes, and on and on. Periodically look to see if there is any row, column, block, or cell that satisfies any of those last three conditions. It's really no more than that. A good trick Gail Nelson taught me is that you can to this hypothesizing starting with a cell with only two values in it and go both ways by placing a circle around the implications for one option and a square around the implications for the other option. You often don't have to go far in either direction to come to a satisfactory conclusion:
This, I find, is a very powerful technique. Except for the Easter Monster puzzle, this technique has solved every Sudoku puzzle I have thrown at it. It is definitely my choice of last resort when solving puzzles by hand. I should probably get Sudoku Assistant doing this, but I haven't done that yet. | |||||||||||||||||||||||||||||||||||||||||||||||||||||||||||||||||||||||||
Depth | |||||||||||||||||||||||||||||||||||||||||||||||||||||||||||||||||||||||||
Full trial-and-error analysis involves adding some element of depth.
The idea here is that if a hypothesis gets to a "dead end"
-- no more conclusions to make, but still no solution --
then all we really have to do is start the sequence over from that configuration.
We can look for singles, locked candidates, subsets, grids, chains, and even do more "subordinate"
hypothesizing. If this process is taken to the extreme, then you basically have a depth-first backtracking solver.
The Sudoku Assistant doesn't go that far. Instead, it takes a middle ground and considers two optional
added elements of depth:
| |||||||||||||||||||||||||||||||||||||||||||||||||||||||||||||||||||||||||
Beyond These Techniques | |||||||||||||||||||||||||||||||||||||||||||||||||||||||||||||||||||||||||
|
Obviously this can't solve all Sudoku puzzles. But so far no one has shown me a puzzle that can't be solved
using ++depth. Using the above techiniques together Sudoku Assistant has solved all of the puzzles I have thrown at it, including
all top95
and all "impossible" 520 puzzles.
This puzzle and also
what I consider the hardest known solvable Sudoku both require ++depth.
And even with all the techniques discussed here, Sudoku Assistant cannot solve this puzzle.
--Bob Hanson | |||||||||||||||||||||||||||||||||||||||||||||||||||||||||||||||||||||||||

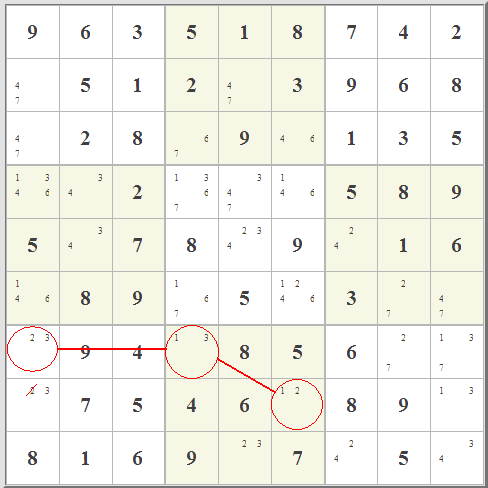


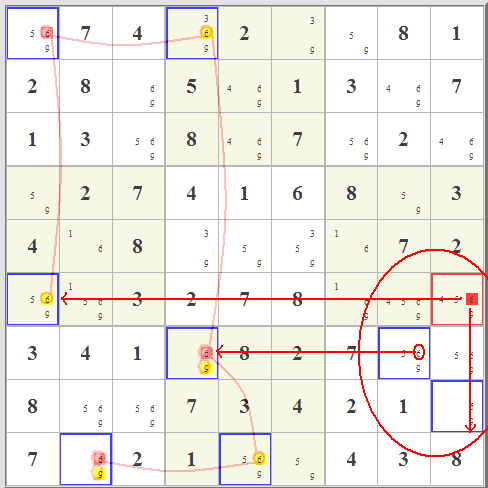
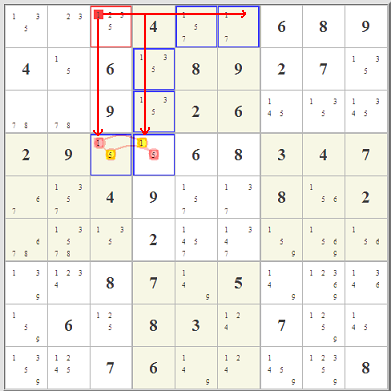
 I got interested in this when I read about
  Really what is up in the top right box is totally immaterial. Starting with the red- and blue-highlighted candidate options,
you can follow the eliminations in red and blue lines. Where the two overlap, that's where you can eliminate any similar candidate. It works because of the
pairing of the two almost-locked ranges. It's really a very clever little idea, one of hundreds, I'm sure, that could involve almost-locked ranges.
The key is not where the candidates are, it's where they are not.
Really what is up in the top right box is totally immaterial. Starting with the red- and blue-highlighted candidate options,
you can follow the eliminations in red and blue lines. Where the two overlap, that's where you can eliminate any similar candidate. It works because of the
pairing of the two almost-locked ranges. It's really a very clever little idea, one of hundreds, I'm sure, that could involve almost-locked ranges.
The key is not where the candidates are, it's where they are not.