
Shop- Built Lighting Cable Cart
by Brian Bjorklund
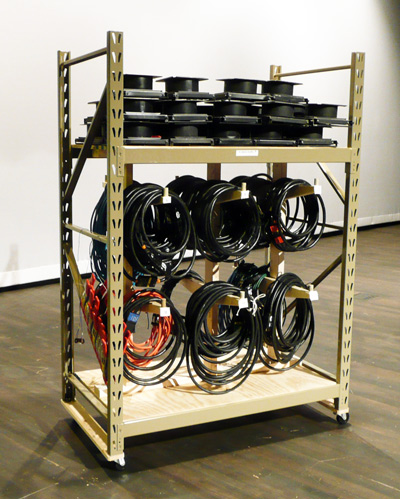
We've had a cable cart for a long time. It's kind of a sad excuse for a cable storage device. It's actually a converted coat rack. If you saw it, you might say it is a bit ingenious. It is pretty functional and has served its purpose pretty well. However, none of us would likely build a storage rack like that if we were starting from the ground up.
My problem was that I had more cable than would fit on the rack. As the years have gone by, DMX cables appeared. Scroller cable was added. 12/5 cable extensions for dimmer bars arrived. Extra Edison cables were purchased for DMX devices. Even a few pieces of stage cable were acquired. At strike, we kept loading the cable cart and the cables wouldn't stay put. The problem was obvious- only so many coils of cable will fit on a storage peg. Somehow, we just kept pushing them on. It's like pressing the button for the walk light at the street intersection- press more often to get your way.
Fast forward to June, 2009. Time to face the problem, admit it and finally decide to do something about it. Get another coat rack at furniture storage? Thankfully grace intervened, and I had a better idea. Off to the lumber yard where I discovered industrial steel shelving end frames.
On the way to the store, I started thinking about design criteria. Better late than never. Here is what I came up with: 1. Must fit through a standard three foot door, 2. Must be strong and durable, 3. Easy to build in a fairly short amount of time. 4. Must incorporate casters easily, 5. Reasonable cost for materials. Oh, and besides the cable, I have some barndoors that need a home.
The industrial steel storage components that I found are manufactured by Gorilla Rack. If you visit their web site (http://www.gorillarack.com/index_invid.htm), you can see the items that were used for this project by clicking on "Individual Pieces" listed under "Products" in the left sidebar of their home page. I selected 30" x 72" end frames and 48" beams to create the basic structure for the cable cart. As you can see in the image, the project used two end frames and four beams. The beams drop into the slots in the end frames and a slight tap with a hammer secures the beam in place. No bolts or welding required.
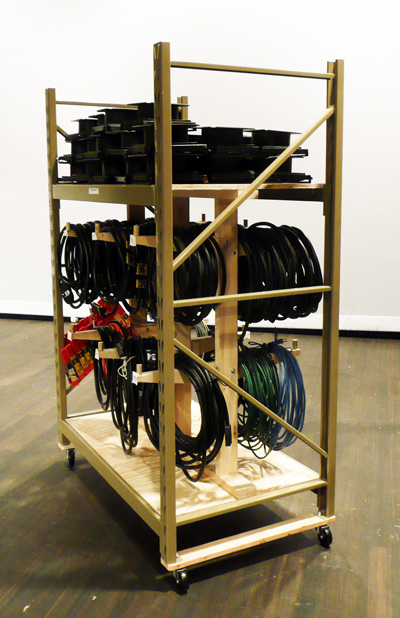
Two beams were placed at the lowest position on the end frames and another pair were located about four feet above those. The end frames have a foot plate with a pre-drilled hole that easily accepts a caster with a threaded stud. I elected to include a piece of 1x4 to make the plate more rigid. (The 3" caster size in the photo above is a bit small. I recommend moving up in size and capacity.)
The beams are designed to accept pieces of sheetboard in recessed channels. I used pieces of 3/4" plywood as my choice. With 48" beams and 30" end frames, a plywood piece cut to 47 1/2" x 28 1/4" sets into the beams accurately. I attached the plywood to the beams with self-drilling screws.
Creating the structure for hanging the cables is the final major step in completing the cable cart. I elected to use 2x4 dimensional lumber. Below is another photo and drawings that detail the construction of that portion of the cart.
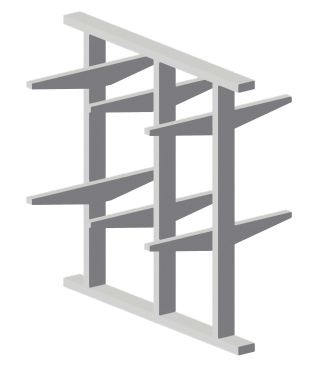 3D view of 2x4 framework

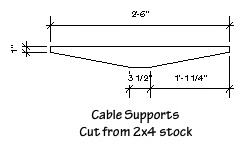
The cable supports were attached with carriage bolts. Gluing the joint is recommended as well. A vertical peg is needed at the end of each cable support to keep the cables from sliding off. Synthetic wine bottle corks attached with 2 1/2" screws were used on the cart that is shown. The collection that had grown in the kitchen drawer was put to good use.
Overall, the project met the design criteria very well. Construction time was reasonable. All the materials were readily available at a local vendor (Menards). Some of the supplies were in stock in the scene shop, which reduced the final cost of the materials.
The cable storage problem is finally solved- at least for the present. AND, I'm really glad I didn't go with another modified coat rack. [ ]
Brian Bjorklund is a faculty member in the Theatre department at St. Olaf College in Northfield, MN