
Creating Mouse Puppets for Cinderella
by Michael Heuer
South Dakota State University
As many can guess, Roger and Hammersteinʼs Cinderella calls for a series of theatrical special effects and requirements. One of these requirements is the incorporation of four mice that Cinderella interacts with onstage.
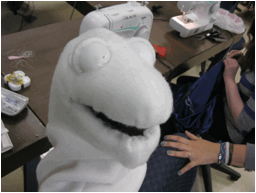
The initial concept, suggested by the director, was to use a series of small prop mice that would be controlled by magnets or a similar device. After some consideration (note that I was the Sound Designer and didnʼt want to encroach on anyoneʼs territory) I approached the director with the idea that perhaps we might consider presenting the mice as puppets. The director was intrigued and gave me the clear to make a demonstration model.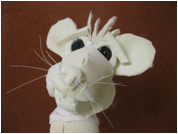 After presenting this initial model I received the clear to go ahead and design/create the rest of the mice. Because of a long standing love for Jim Hensonʼs Muppets, I decided to take some inspiration from his style. This meant that the puppets would be the standard hand-in-mouth rod style.
I had made full foam models in the past, but had never actually put the skin (fur) on one before. The idea was present, but I lacked the technique. Because of this, I took advantage of one the best
tools an academic has at their disposal: Youtube.com.
The series I found is located at http://www.youtube.com/watch?v=bFnuv6uebVU. This series of videos 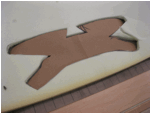 was especially helpful when I was first developing my patterns and techniques. Please check it out if you get the opportunity.
When making my puppets, I first started by creating a mockup pattern with paper. I needed a head, jaw, mouth, arms, and body. The basic head pattern is pictured to the right. If you look at the pattern, the center fold marks the back of the head. Darts are located above that fold to assist with the contour.
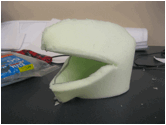
From there, I cut out the traced pattern using a razor blade on the foam. Next, with the aid of hot glue, I proceeded to glue the seams. The video series suggests a more permanent adhesive, but for my purposes I found that hot glue was much
more cost friendly, and time efficient Pictured below the is the basic skull of the puppet.
 With the skull complete, I needed to craft my mouthpiece. This element is the most important when it comes to the durability and longevity of the puppet. You need a material that can be cut and receive adhesive. I used foam board, but after 14 performances and a series of rehearsals, the foam board took some wear and tear. If you choose to use foam board for your puppet, I suggest coating the piece with a sealant or duct tape to prevent moisture from eroding away the material. Below is a time lapse of the mouth piece construction.
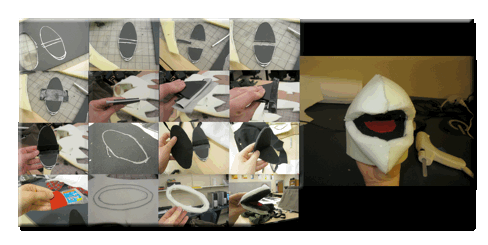 The mouth piece was attached to the head using hot glue. This is what the foam ring on the foam board assists with. After finishing this piece, I went ahead and created my fabric pieces. Note that I never made an actual body piece out of foam. Due to the movement I wanted to accomplish, the foam body would have been too restricting, so I left out the foam and opted for the body to just be
fabric covering for the actorʼs arm.
The fabric “skin” was crafted out of fleece using the original paper patterns I had made for the foam pieces. To adapt the patterns, I simply added a 5/8” seam allowance with a ruler and traced them out on the fleece. The pieces were then cut out and stitched together as pictured right. Next, I went around and trimmed off any excess allowance I could afford. After the trimming, I went ahead and pressed the seams so theyʼd be flat once attached to the foam head piece.
The head piece was placed inside the skin through the mouth. Any necessary adjustments were then made before marking where the eye sockets would be placed. Once the socket locations where set I went ahead and stitched them on before attaching the skin to the head. My other approach involved attaching the sockets after the skin had been adhered to the foam. This worked as well, but I would use hot glue when attaching the actual pieces. Time was saved by doing so, but durability was sacrificed.
When embedding the mouth, hot glue is placed in the center of the upper mouth at the gum line. That location is just a personal preference. After the glue is placed, the fabric around the mouth is tucked into the glue. The goal is to try and make a hidden adhesion point. Smoother is definitely better in this situation. After finishing the top of the mouth, I went ahead and did the bottom in the same manner. This point in the process is pictured below.
 As you may be able to the guess, the eyes are made out of ping pong balls that have been halved. I prefer ping pong balls over spoons because they offer much more dimension in cartoony puppets. The eyes are first placed into the sockets, and then sealed in with hot glue. If you use the second technique mentioned earlier, the eyes go on first and are attached with hot glue. The lids are then glued over the eyes. Again, this is much more time efficient, but you really do sacrifice a level of durability.
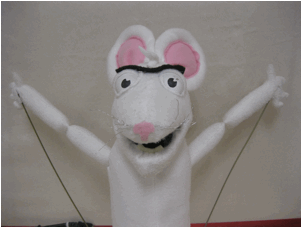
From here, the eye pupils were drawn in with a sharpie and then painted with a brush. After that, I went ahead and free styled some ears using two pieces of fleece overlaid. With this technique, I went ahead and drew the shapes I wanted. After I had them, I simply traced the lines using my sewing machine and trimmed off the excess fabric around the pieces. The ears were then turned inside out and partially stuffed with polyfil. I then stitched the ridge of the ear, and attached a pink inner lining. Next, I hand stitched the ears where I wanted them on the head. After this was done, I added the finishing touches. This included a unibrow (thereʼs one in every bunch), a pink nose, wire whiskers, and some foam teeth. The finished head is pictured below.

After finishing the head, I went on to the arms. This was accomplished with the same method as the ears. With the arms traced, stitched, and cut out, I went ahead and trimmed off as much excess seam fabric as possible. This was key to getting the arms turned right side out. Once the arms were set, I added the polyfil. I found that using a set of needle-nosed pliers was especially effective. When I reached the elbow joint, I sealed that segment shut by stitching it closed with the machine. This allowed a better ability to bend at the elbow. Without it, the arms were very rigid. Following the stitching I filled the rest of the arm with polyfil and sealed it shut. The finished arms were then attached to the mouse body with hand-stitching.
The rods were created with old hangers. By clipping the bottom section off one side and then clipping the other side with some leftover bend, I was able to make a sort of straight rod with a hook at the end. The hook was slipped into the mouseʼs paw and hand stitched till secure. I suggest that you consider reinforcing those stitches a number of times because some actors get a bit rough with the rods, and they can break free of even the most secure stitching. Once completed the puppet was finished. Below is the finished model of the process shots puppet.
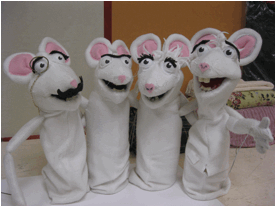
Here is the whole gang
 This project was definitely an adventure from start to finish. I donʼt have an exact measurement of how much foam was used, but it didnʼt exceed $30 worth. The fleece cost about $3 a yard and I used around eight yards throughout the process. The ping pong balls were $8 for a six pack at Walmart. Without counting the hot glue, the total project, creating four mice, cost about $62 dollars. Most of these products can be found in your typical costume or prop shops. The real cost is time. Each puppet took approximately seven hours to complete, but the end result was definitely worth it. The children absolutely loved the mice. During the afternoon childrenʼs matinees, the mice were used to usher and entertain the children before the show. Though not necessary to the production, the puppets added a wonderful element to an otherwise overlooked character component to the show, and I found them to be highly entertaining.
Over the years, I have found that artists are only limited by their creativity. I went into this project knowing little about puppet construction and walked out with four mice. The internet is a wonderful tool that should never be overlooked. After doing so many animals I wanted to do a puppet for myself. If you know South Dakota State University faculty member Corey Shelsta, here is a puppet I modeled after him. Human Corey, and puppet Corey have yet to meet.
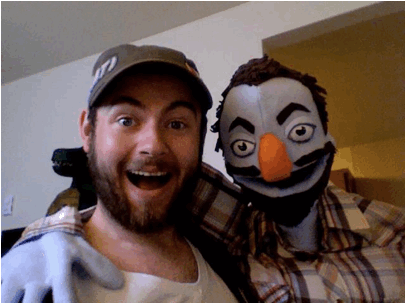
Michael Heuer and Puppet Corey