Compiling the Linux Kernel
CS 273 (OS), Fall 2020
Compiling the kernel
Insure you have enough hard disk
Your virtual disk will require more than 5-8 GB in order to recompile the kernel successfully. 16-20GB should be sufficient. You can enlarge a VDI virtual disk using the command-line program
vboxmanageas described belowConfigure the kernel
These instructions assume that you have performed all of the steps in the VirtualBox lab.
Start up your virtual system, then enter the following commands:$ cd /usr/src/linux-5.0.21 $ sudo apt install flex bison make $ sudo make localmodconfig $ sudo make menuconfigConfiguration is selecting options for your kernel. There are dozens of configuration options to choose, and some may make the difference whether or not your kernel will work on your computer. In the great majority of cases, the default choice in these configuration steps is a good choice.
The
configtarget formake(which we aren't using) presents each option by name with a selection of actions. For example:WM8350 GPIOs (GPIO_WM8350) [N/m/y/?]
prompts for one of three choicesn, m,andyfor a configuration option namedGPIO_WM8350.nmeans to decline that optionmmeans to make that option loadable while the kernel is running, as a moduleymeans to include that option in the kernel?prints some information about that option, then reprints the prompt
The default choice (Enter key) is capitalized (
Nin this case). Note: Some items may additionally be labelled(NEW),(EXPERIMENTAL), etc. For our purposes, we will generally decline these choices unless we find we need them for some reason.A prompt is provided for most or all NEW items, and the default response (capitalized) is ordinarily N, so we recommend accepting all defaults.
One new setting is
Default security module, which requires a numerical response. RAB selected 1, for the well-known SELinux.
We are avoiding the
configtarget because it tediously presents hundreds of these prompts that each require a response, with no way to back up (other than re-entering everything again).The
localmodconfigtarget automatically selects only options that appear on the (virtual) system you are using. This will save on compilation time and kernel size, although it makes the resulting kernel less portable.Note: the
localmodconfigtarget will prompt you whether to accept any new features, marked(NEW). You can safely respond Enter to accept all of those features (the default).Use of
menuconfig: We want to insure that theext4andisofile system supports are included, so check that these are included during the interactivemenuconfigtarget. In April 2018, iheisofile system was found under a submenuDVD/CD-ROM file systems. of theFile systems menu, and needed to be selected (Y).If you get a message saying that your terminal window is too small, enter CTRL/- in your terminal window to correct your terminal window's settings
Enter TAB character to exit from a submenu, menu, or ultimately the
menuconfigprogramExit and save changes.
Choose the default filename
.config, since that configuration file is used to make the kernel.Also make yourself a backup copy, e.g.,
$ sudo cp .config first.config
This will allow you to restore these settings in case something happens to your.configfile. (make menuconfigautomatically creates a backup.config.bak, but that backup may change if you make themenuconfigtarget again.)
RECOMPILING: After your first successful compile (below), to recompile with your previous configuration, enter
$ sudo make oldconfig
instead of either thelocalmodconfigormenuconfigtargets. This saves you the unnecessary hassle of reconfiguring each time you compile the kernel.
Compile the kernel
First, an additional package needs to be installed. This installation only needs to be performed once per Ubuntu installation.
$ sudo apt install libssl-dev
To compile the kernel: In
/usr/src/linux-5.0.21,$ sudo make
Expect perhaps 30-40 min for a complete compile.
Install the kernel
$ sudo make modules_install install
This installs the new kernel in
/bootSystem.map-5.0.21vmlinuz-5.0.21initrd.img-5.0.21Initial RAMdisk. If missing, you can try to create or update one.
config-5.0.21
grub-- GNU GRand Unified Bootloader, allows you to choose which kernel to boot when rebooting your virtual OS within your virtual machine.During boot of your operating system (on your virtual machine),
______grubpresents a menu for you to select which kernel to boot. The behavior ofgrub______The installation should update the file
/boot/grub/grub.cfgby adding three sections for your new 5.0.21 kernel. If it doesn't, you must add those sections to thegrub.cfgfile, then update grub using$ sudo update-grub
Note: Do not performupdate grubif sections were already added for your 5.0.21 kernelNote: The
recoveryentry ingrub.cfgenables you to make repairs in a broken (virtual) OS setup in case of emergency.RECOMPILING: to save time on a recompile, omit installing the modules on future recompiles
Test the new kernel
First, enter the command
$ uname -r
which indicates the Linux version number for the kernel that came with your distribution of Ubuntu. Make a note of the output.Now, shut down and restart your virtual system.
When you restart your system, your new kernel should may not be selected by default (Fall 2020). To choose your new kernel manually, reboot as follows.
When restarting your VM, as soon as the VM's window appears, press and hold the right-shift key in that new VM window.
While you are holding the right-shift key, a menu such as the following will appear:
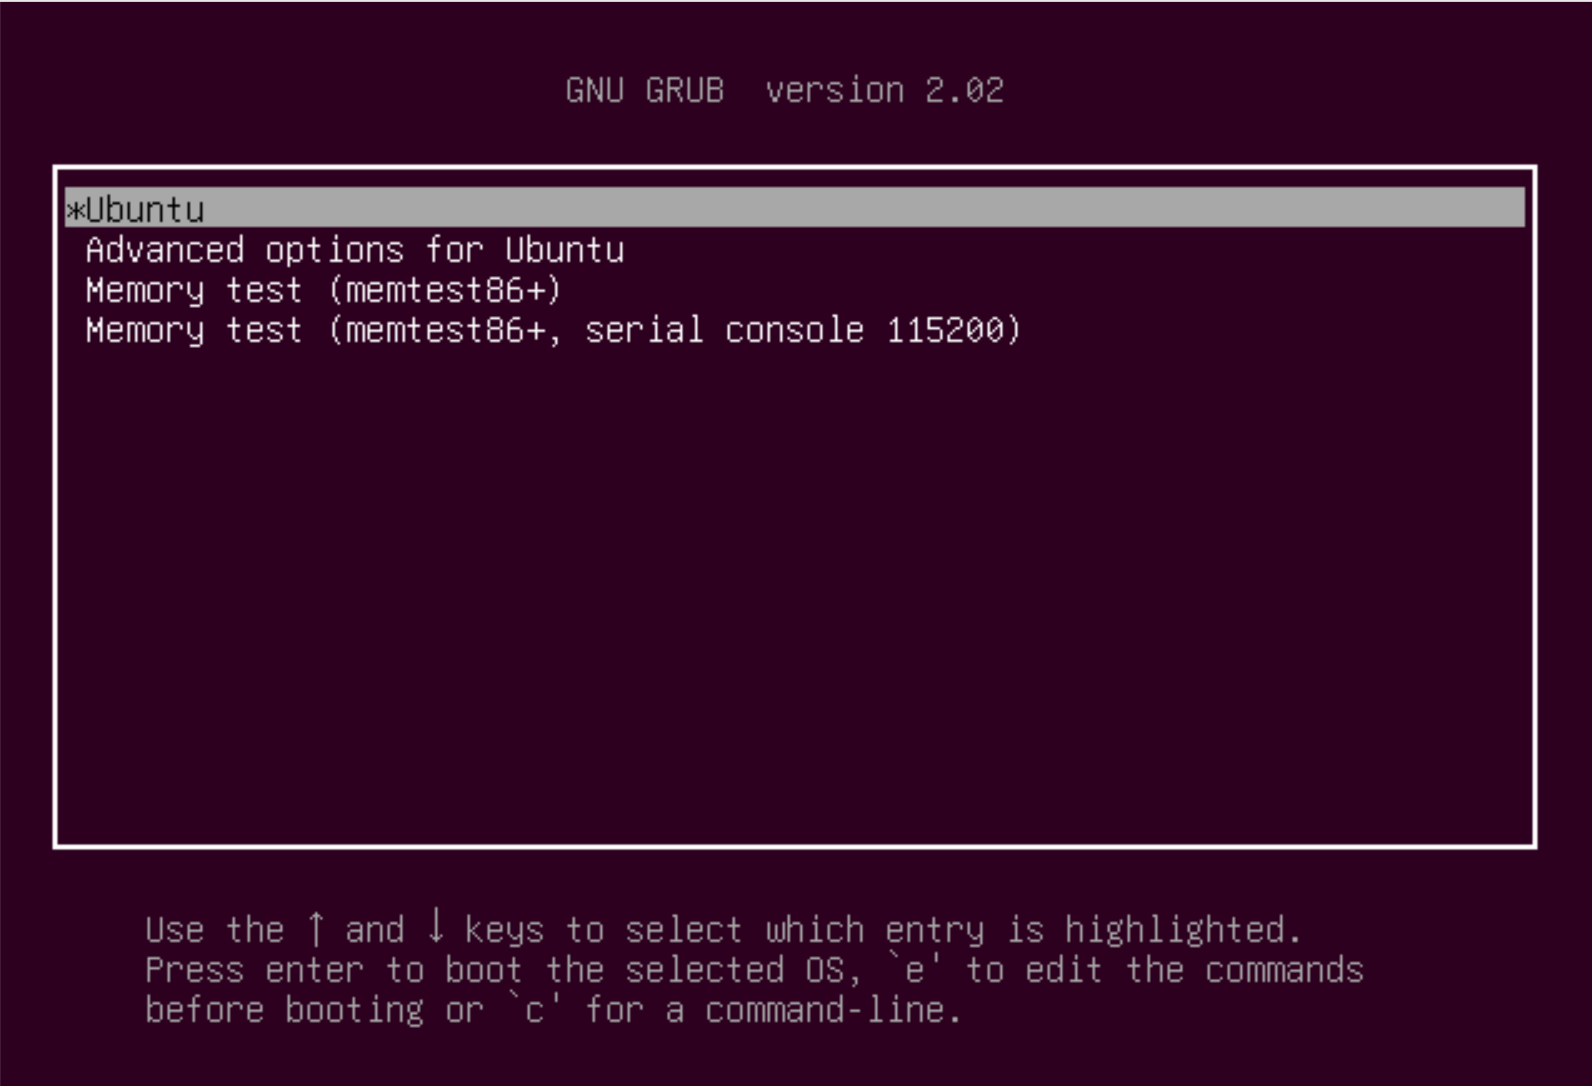
GRUB is the GNU boot loader, which allows you to choose which kernel to boot.
Use the down-arrow key and enter to select "Advanced options for Ubuntu". Then select your kernel labelled with , and press the enter key to boot from that kernel.
Don't choose the kernel labelled "(recovery mode)", which is for taking extraordinary recovery actions, for example, if the file system on your virtual disk becomes corrupted.
The boot should now proceed as normal using your kernel. (If your new kernel doesn't successfully boot, you can power your VM off then use GRUB to restart choosing a different kernel.
After you log in, the command
$ uname -r
indicates the Linux version number for the currently running kernel (we expect 5.0.21 for your new kernel)Note: In Spring 2018, at least one person (Mac system) found that after booting the new kernel, first login screen seemed to receive mouse events but not keyboard events (which prevented entering a password).
A workaround was to select the Guest account for login (which has no password), then logging out from that Guest account. Future login screens accepted the keyboard events, even after rebooting the OS or powering down the VM.
How to enlarge a VDI hard disk using
vboxmanage
Be sure to shut down your virtual machine.
Find the file name of your virtual disk.
You can enter the command
% vboxmanage list hdds
on a terminal window on your host OS will list your hard disks. Note: On a Windows computer, you may need to precede thevboxmanagecommand with its full path.If it's not obvious which disk goes with your virtual machine, you can use the GUI-based Virtual Box manager to find the disk filename by: (1) selecting your virtual machine, then clicking Settings; (2) select storage, and click on the virtual disk on the left pane; (3) look for the location entry on the right; (4) copying that filename.
Now, resize the hard disk using
$ vboxmanage modifyhd "filename" --resize 20480
Here,filenameis the file name you found before, and the value 20480 (in megabytes) specifies exactly 20GB. Use 16384 (in megabytes) to specify 16GB.Shutdown and restart Virtual Box, so that your image will recognize the new hard disk size
Note: Increasing the size of a disk image like this is easy, but decreasing one may require compacting the file system within (rearranging blocks to create a range of unused blocks at the end of that file system), and is not recommended even if
vboxmanagesupports it (which is doubtful).You have now enlarged the virtual disk, but this does not enlarge the partition on that virtual disk that contains your file system. This will require editing the partition table on your virtual disk.
First, back up your virtual disk so you can retrieve your data in case something goes wrong. (Making an error in the partition table can render your disk unusable, but you could start over again with the copy.) To make a backup copy,
Determine the location of your virtual disk, either within VirtualBox (click on Storage for your virtual machine and mouse-over the virtual disk's name) or using
vboxmanagevboxmanage list hdds
Make sure your VM is shut down, then make a copy of that file, perhaps using the same file name plus an added
.bu
Note: This backs up your virtual disk, which your VM needs in order to connect to your files. It's also possible to back up your VM itself, i.e., the VirtualBox settings for your VM. VirtualBox uses an ID number system to avoid starting VMs with disks that don't belong to it.
Obtain a bootable copy of a disk partition editor. We will assume
gpartedBoot from
gpartedWhile your VM is still off, select that VM and click on Storage.
If an ISO image is already loaded on your IDE controller, virtually eject it ("remove the attachment from the storage tree") using the second of the four control buttons
Then, click on
Controller: IDEand use the first (leftmost) of those buttons to virtually insert yourgpartedISO image ("add a new attachment to the storage tree"). You will need to browse to that image.Then restart your VM, use the F12 key and choose to boot from CDrom instead of your virtual disk
gpartedboots as a "live CD" that will first ask some setup questions (default answers will probably work for you). Then, you will see a display such as the following: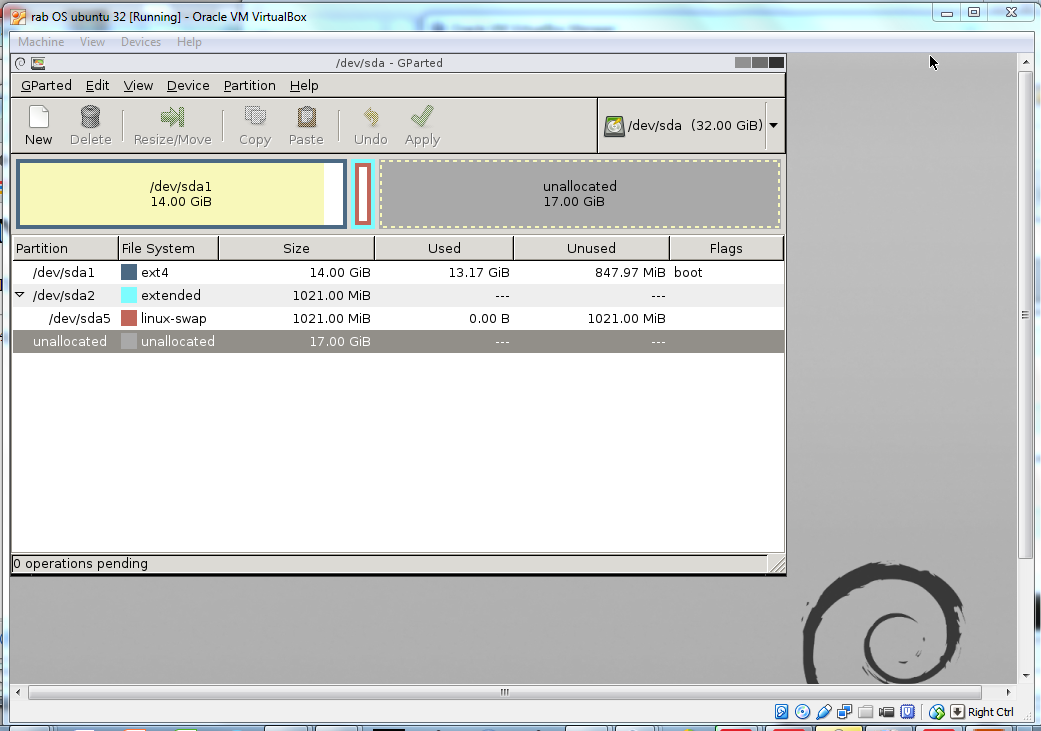
Rather than take the risk of moving any partitions, we will add a new
ext4partition to hold additional files.
Note:gpartedoperates by preparing a "to-do" list of pending partitions before making any change in your disk. This gives you an opportunity to undo any or all of those pending operations before performing any actions that cannot be undone.Select the
Unallocatedarea if that isn't already selected.Under
Partition, selectNew, then selectAdd. This installs a fresh file system on a newly created partition.Check that the pending operations correctly reflect the changes you want, then click
Apply(green check-mark icon).Note the path of the new file system (such as
/dev/sda3)
Now, shut down your virtual machine and reboot into Ubuntu as usual. Within your VM, you should be able to mount your new file system on a directory of your choice such as the generic mount point
/mnt, using a command such as this:$ sudo mount /dev/sda3 /mnt
Thereafter, you should be able to store and access files on/mnt.